Typically, cloud servers are initially set up using Greenwich Mean Time (GMT) or the local time of the data center. If used domestically, this can affect the accurate display of website data and system log times. This guide demonstrates how to change the time zone of a cloud server to Beijing time, specifically for Ubuntu systems.
To view the current time and time zone, we use the date command.
dateThe returned result is as follows:
Fri Feb 21 06:44:55 UTC 2020This indicates that the cloud server is currently using the UTC time zone (Coordinated Universal Time).
Use the following command to change the time zone.
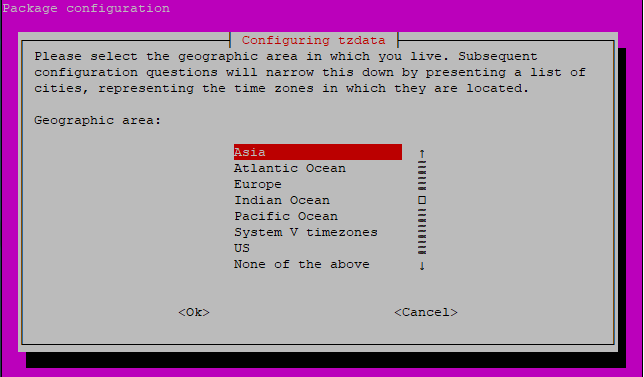
dpkg-reconfigure tzdataThis command opens a graphical interface, navigated using the up and down arrow keys. To change the time zone to Beijing time, select “Asia” and confirm with Enter.

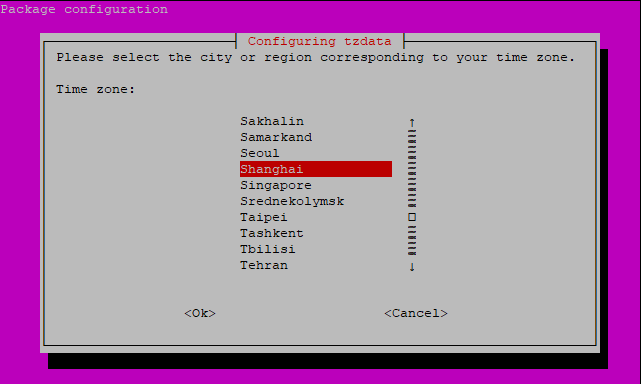
Then select the city. As there are many cities listed, pressing the 's' key can quickly locate “Shanghai,” followed by another Enter to confirm.

The time zone has been successfully changed, as indicated by the system prompt.
Current default time zone: 'Asia/Shanghai'
Local time is now:      Fri Feb 21 14:46:08 CST 2020.
Universal Time is now: Fri Feb 21 06:46:08 UTC 2020.The NTP service is a daemon that runs on Linux operating systems for synchronization with remote NTP servers. Use the following command to install the NTP service.
apt-get install ntpSince the NTP service requires communication through port 123 to function properly, this port needs to be opened in the firewall.
Use iptables:
iptables -A INPUT -m state --state NEW -m udp -p udp --dport 123 -j ACCEPTOr use UFW:
ufw allow 123With this, the time zone change and firewall configuration for the Ubuntu cloud server are complete.
23-02-2024 02:02:07
22-02-2024 03:19:32
22-02-2024 03:16:03
22-02-2024 03:14:03
22-02-2024 03:11:58